AWS Security Specialty - Practice Test Notes
Correct
Lambda@Edge is a feature of Amazon CloudFront that lets you run code closer to users of your application, which improves performance and reduces latency. With Lambda@Edge, you don’t have to provision or manage infrastructure in multiple locations around the world. You pay only for the compute time you consume – there is no charge when your code is not running.
With Lambda@Edge, you can enrich your web applications by making them globally distributed and improving their performance — all with zero server administration. Lambda@Edge runs your code in response to events generated by the Amazon CloudFront content delivery network (CDN). Just upload your code to AWS Lambda, which takes care of everything required to run and scale your code with high availability at an AWS location closest to your end-user.
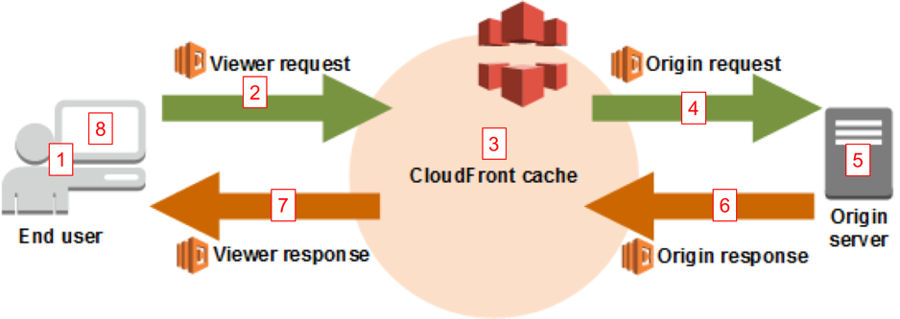
Security headers are a group of headers in the HTTP response from a server that tell your browser how to behave when handling your site’s content. For example, X-XSS-Protection is a header that Internet Explorer and Chrome respect to stop the pages loading when they detect cross-site scripting (XSS) attacks. You can automatically add a set of HTTP security headers using Lambda@Edge by creating a function that gets the contents of the response, sets the new headers, then returns the updated response that includes the new headers.
Hence, the correct answer is: Add the required HTTP security headers using Lambda@Edge and CloudFront.
The option that says:** Enable DNSSEC in the Amazon Route 53 record of the serverless application** is incorrect as Domain Name System Security Extensions (DNSSEC) is primarily used to prevent DNS spoofing or man-in-the-middle attacks. It is not capable of adding HTTP security headers to your application.
The option that says: Configure the CloudFront distribution to use signed cookies is incorrect because the CloudFront signed cookies feature simply allows you to control who can access your content when you don’t want to change your current URLs or when you want to provide access to multiple restricted files, for example, all of the files in the subscribers’ area of a website.
The option that says: Launch an AWS WAF custom rule to add the required security headers by using regular expression (RegEx) match condition is incorrect because this feature is primarily used if you want to allow or block web requests based on strings that match a regular expression (regex) pattern that appears in the requests. AWS WAF is not capable of automatically adding HTTP security headers to your application requests. You have to use Lambda@Edge instead.
References:
https://docs.aws.amazon.com/waf/latest/developerguide/classic-web-acl-regex-conditions.html
Check out these Amazon CloudFront and AWS Lambda Cheat Sheets:
https://tutorialsdojo.com/amazon-cloudfront/
https://tutorialsdojo.com/aws-lambda/
Correct
AWS CloudTrail is an AWS service that helps you enable governance, compliance, and operational and risk auditing of your AWS account. Actions taken by a user, role, or an AWS service are recorded as events in CloudTrail. Events include actions taken in the AWS Management Console, AWS Command Line Interface, and AWS SDKs and APIs. CloudTrail is enabled on your AWS account when you create it. When activity occurs in your AWS account, that activity is recorded in a CloudTrail event. You can easily view recent events in the CloudTrail console by going to Event history.
By default, trails do not log data events. The events that are logged by your trails are available in Amazon CloudWatch Events. For example, if you configure a trail to log data events for S3 objects but not management events, your trail processes and logs only data events for the specified S3 objects. The data events for these S3 objects are available in Amazon CloudWatch Events.

There are no predefined rules to track and send notifications about the use of IAM credentials. However, by using a combination of AWS CloudTrail and Amazon CloudWatch Events with a custom rule, you can send a notification to an Amazon Simple Notification Service (Amazon SNS) topic or Amazon Simple Queue Service (Amazon SQS) queue.
CloudWatch Events and rules are represented as JSON objects. A rule has a simple match or no match logic applied to events. Based on the structure of events, you can build custom patterns for the specific criteria that you want to match. You must have a trail enabled to send notifications to an SNS topic or SQS queue. Your trail’s management events must be configured as Write-only or All.
Hence, the correct answer is: Ensure that the trail’s management events are configured as Write-only or All.
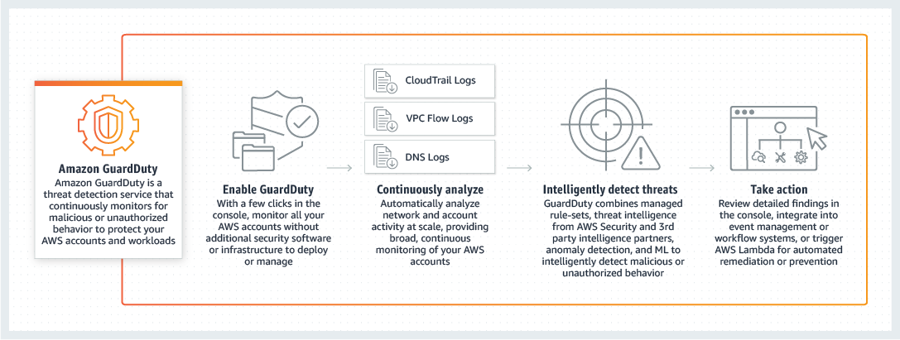
The option that says: Replace Amazon CloudWatch Events with Amazon GuardDuty is incorrect because Amazon GuardDuty is just a threat detection service that continuously monitors for malicious activity and unauthorized behavior to protect your AWS accounts and workloads. You don’t need to replace Amazon CloudWatch Events in this scenario.
The option that says: Use Amazon Macie instead of AWS CloudTrail to track the IAM access key usage is incorrect because Amazon Macie is simply a security service that uses machine learning to automatically discover, classify, and protect sensitive data in Amazon S3 and other AWS storage services.
The option that says: Ensure that the CloudTrail log files are encrypted with AWS KMS–Managed Keys (SSE-KMS) is incorrect because CloudWatch Events can still send the alerts even if CloudTrail is not using SSE-KMS.
References:
https://aws.amazon.com/premiumsupport/knowledge-center/track-access-key-credential/
https://aws.amazon.com/blogs/mt/monitor-changes-and-auto-enable-logging-in-aws-cloudtrail/
Check out this AWS CloudTrail Cheat Sheet:
https://tutorialsdojo.com/aws-cloudtrail/
Incorrect
IAM and AWS STS are integrated with AWS CloudTrail, a service that provides a record of actions taken by an IAM user or role. CloudTrail captures all API calls for IAM and AWS STS as events, including calls from the console and from API calls. If you create a trail, you can enable continuous delivery of CloudTrail events to an Amazon S3 bucket. If you don’t configure a trail, you can still view the most recent events in the CloudTrail console in Event history. You can use CloudTrail to get information about the request that was made to IAM or AWS STS. For example, you can view the IP address from which the request was made, who made the request, when it was made, and additional details.

If you want to view and track account activity history for specific IAM users, roles, and AWS access keys, you can use AWS CloudTrail event history, Amazon CloudWatch queries, or Amazon Athena queries. You can use CloudTrail to search event history for the last 90 days only. You can run CloudWatch queries to search the API history made by a specific IAM user or access key beyond the last 90 days. Alternatively, consider using Amazon Athena to query CloudTrail logs over the last 90 days.
Hence, the correct answers are:
Use AWS CloudTrail to view the activity history
Use Amazon CloudWatch Log queries to search the API history
The option that says: Use Amazon Inspector to view the complete activity history of the compromised credential is incorrect because Amazon Inspector is just an automated security assessment service that helps improve the security and compliance of applications deployed in AWS. It doesn’t track account activity history for specific IAM users, roles, and AWS access keys. You have to use CloudTrail or CloudWatch Log queries instead.
The option that says: View the complete activity history of the compromised credential using AWS Config is incorrect because although AWS Config continuously monitors and records your AWS resource configurations, it doesn’t track or record the API activities of IAM users, roles, and AWS access keys.
The option that says: Generate and download the credential report from IAM to view the complete activity history for the past 4 hours is incorrect because although the credential report contains helpful information, it still doesn’t provide the activity history of the credential. The report contains the AWS service that was most recently accessed with the access key, the date and time when the AWS account root user or IAM user’s password was last used to sign in and many more. But the information included in the report is still lacking since it will only show the most recent activities and not the historical data.
References:
https://aws.amazon.com/premiumsupport/knowledge-center/view-iam-history/
https://aws.amazon.com/premiumsupport/knowledge-center/cloudtrail-event-history-changed/
https://docs.aws.amazon.com/IAM/latest/UserGuide/id_credentials_getting-report.html
Check out this AWS Identity & Access Management (IAM) Cheat Sheet:
https://tutorialsdojo.com/aws-identity-and-access-management-iam/
Correct
You can invite other accounts to enable GuardDuty and become associated with your AWS account. When an invitation is accepted, your account is designated as the master GuardDuty account. The account that accepts the invitation becomes a member account associated with your master account. You can then view and manage the GuardDuty findings on behalf of the member account. In GuardDuty, a master account (per region) can have up to 1000 member accounts.
An AWS account cannot be a GuardDuty master and member account at the same time. An AWS account can accept only one GuardDuty membership invitation. Accepting a membership invitation is optional.
Cross-regional data transfer can occur when GuardDuty member accounts are created. In order to verify member accounts’ email addresses, GuardDuty uses a non-AWS account information verification service that operates only in the AWS US East (N. Virginia) Region.
Users from the master account can configure GuardDuty as well as view and manage GuardDuty findings for their own account and all associated member accounts.
The following is how users from a master account can configure GuardDuty:
Users from a master account can generate sample findings in their own account. Users from a master account CANNOT generate sample findings in members’ accounts.
Users from a master account can archive findings in their own accounts and in all member accounts.
Users from a master account can upload and further manage trusted IP lists and threat lists in their own account.
Users from member accounts can configure GuardDuty as well as view and manage GuardDuty findings in their account. Member account users can’t configure GuardDuty or view or manage findings in the master or other member accounts.
The following is how users from a member account can configure GuardDuty:
Users from a member account can generate sample findings in their own member account. Users from a member account can’t generate sample findings in the master or other member accounts.
Users from a member account can’t archive findings either in their own account or in their master’s account, or in other member accounts.
Users from a member account can’t upload and further manage trusted IP lists and threat lists.
Trusted IP lists and threat lists that are uploaded by the master account are imposed on GuardDuty functionality in its member accounts. In other words, in member accounts GuardDuty generates findings based on activity that involves known malicious IP addresses from the master’s threat lists and does not generate findings based on activity that involves IP addresses from the master’s trusted IP lists.
Hence, the correct answers are:
Users from a member account can’t archive findings either in their own account or in their master’s account, or in other member accounts.
Users from a master account can upload and further manage trusted IP lists and threat lists in their own account.
Users from a member account can’t upload and further manage trusted IP lists and threat lists.
The option that says: Users from a master account can’t generate sample findings in their own account but can generate sample findings in members’ accounts is incorrect because users from a master account can generate sample findings in their own account but cannot generate sample findings in members’ accounts.
The option that says: Users from a member account can’t generate sample findings in their own member account but can generate sample findings in the master or other member accounts is incorrect because users from a member account can actually generate sample findings in their own member account but can’t generate sample findings in the master or other member accounts.
The option that says: Users from a master account can’t archive findings in their own accounts and in all member accounts is incorrect because it should be the other way around: users from a master account can archive findings in their own accounts and in all member accounts.
References:
https://docs.aws.amazon.com/guardduty/latest/ug/guardduty_accounts.html
https://docs.aws.amazon.com/guardduty/latest/ug/guardduty_findings_cloudwatch.html
Check out this Amazon GuardDuty Cheat Sheet:
https://tutorialsdojo.com/amazon-guardduty/
Incorrect
An important consideration when architecting on AWS is to limit the opportunities that an attacker may have to target your application. For example, if you do not expect an end user to directly interact with certain resources, you will want to make sure that those resources are not accessible from the Internet. Similarly, if you do not expect end-users or external applications to communicate with your application on certain ports or protocols, you will want to make sure that traffic is not accepted. This concept is known as attack surface reduction. Resources that are not exposed to the Internet are more difficult to attack, which limits the options an attacker might have to target the availability of your application.
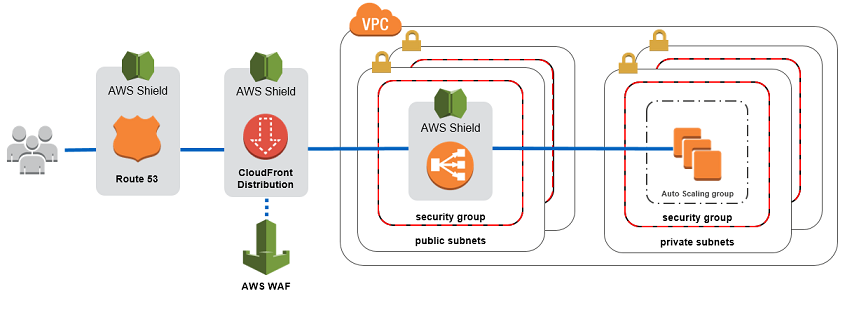
AWS Shield is a managed DDoS protection service that is available in two tiers: Standard and Advanced. AWS Shield Standard applies always-on detection and inline mitigation techniques, such as deterministic packet filtering and priority-based traffic shaping, to minimize application downtime and latency. AWS Shield Standard is included automatically and transparently to your Elastic Load Balancing load balancers, Amazon CloudFront distributions, and Amazon Route 53 resources at no additional cost. When you use these services that include AWS Shield Standard, you receive comprehensive availability protection against all known infrastructure layer attacks. Customers who have the technical expertise to manage their own monitoring and mitigation of application layer attacks can use AWS Shield together with AWS WAF rules to create a comprehensive DDoS attack mitigation strategy.
Using AWS Shield together with AWS WAF rules provide a comprehensive DDoS attack mitigation strategy.
Hence, the correct answers are:
Create a security group that only allow certain ports and authorized servers and protect your origin servers by putting it behind a CloudFront web distribution. Enable AWS Shield Advanced which provides enhanced DDoS attack detection and monitoring for application-layer traffic to your AWS resources.
Set up the Network Access Control Lists (ACLs) to only allow the required ports and network addresses in your network. Use AWS WAF to block and identify common DDoS request patterns to effectively mitigate a DDoS attack.
The option that says: Launch an Application Load Balancer and Auto Scaling to your EC2 instances to improve availability and scalability. Set up large Amazon EC2 instances to accommodate a surge of incoming traffic caused by a DDoS attack. Utilize AWS Systems Manager Session Manager to filter all client-side web sessions to your instances is incorrect because although it improves the scalability of your network in case of an ongoing DDoS attack, it just absorbs the heavy application layer traffic and doesn’t minimize the attack surface in your cloud architecture. In addition, the AWS Systems Manager Session Manager is primarily used to provide secure and auditable instance management without the need to open inbound ports, maintain bastion hosts, or manage SSH keys, but not to filter client-side web sessions.
The option that says: Enable object versioning on all Amazon S3 buckets. Verify that the EC2 instances are properly patched using Systems Manager Patch Manager is incorrect because although it is recommended that all of your instances are properly patched using the Systems Manager Patch Manager, it is still not enough to protect your cloud infrastructure against DDoS attacks. Moreover, enabling S3 object versioning is not helpful in blocking DDoS attacks.
The option that says: Implement Multi-Factor Authentication (MFA) in AWS and use a combination of AWS Systems Manager State Manager, AWS Config, and Trusted Advisor to secure your AWS resources is incorrect because MFA doesn’t minimize the DDoS attack surface area. In addition, the AWS Systems Manager State Manager is just a configuration management service that automates the process of keeping your Amazon EC2 and hybrid infrastructure in a state that you define. This service will not help you minimize the blast radius of a security attack.
References:
https://aws.amazon.com/answers/networking/aws-ddos-attack-mitigation/
https://d1.awsstatic.com/whitepapers/Security/DDoS_White_Paper.pdf
https://d0.awsstatic.com/whitepapers/DDoS_White_Paper_June2015.pdf
Correct
AWS CloudTrail is an AWS service that helps you enable governance, compliance, and operational and risk auditing of your AWS account. Actions taken by a user, role, or an AWS service are recorded as events in CloudTrail. Events include actions taken in the AWS Management Console, AWS Command Line Interface, and AWS SDKs and APIs.
When you create an alarm, you can configure it to perform one or more automated actions when the metric you chose to monitor exceeds a threshold you define. For example, you can set an alarm that sends you an email, publishes to an SQS queue, stops or terminates an Amazon EC2 instance, or executes an Auto Scaling policy. Since Amazon CloudWatch alarms are integrated with Amazon Simple Notification Service, you can also use any notification type supported by SNS.

You can create a CloudWatch Alarm that is triggered when configuration changes happen that involve security groups. Below are the Security Group API call event types that you can add in the Filter Pattern of your CloudWatch Alarm:
CreateSecurityGroup – Create a Security Group
DeleteSecurityGroup – Delete a Security Group
AuthorizeSecurityGroupEgress – Add an Outbound Rule
AuthorizeSecurityGroupIngress – Add an Inbound Rule
RevokeSecurityGroupEgress – Remove an Outbound Rule
RevokeSecurityGroupIngress – Remove an Inbound Rule
Hence, the correct answers are:
Ensure that the
Filter Patternincludes theAuthorizeSecurityGroupIngressevent in CloudWatch Alarm.Ensure that a metric filter was created in CloudWatch Alarm with a correct
Filter Patternand aMetric Valueof 1.
The option that says: Verify that a metric filter was created in CloudWatch Alarm with a Metric Value of 10 with a correct Filter Pattern is incorrect because a metric value of 10 will not immediately notify the Security team when someone modified a security group. This configuration means it would take 10 security group changes before a notification will be sent.
The option that says: Use Amazon Inspector to periodically scan all security groups and monitor if there are any modifications is incorrect because Amazon Inspector is just an automated security assessment service that helps improve the security and compliance of applications deployed on AWS. It cannot scan and monitor all your security groups. You have to stick with AWS CloudTrail and CloudWatch Alarm for this use case.
The option that says: Verify that the Filter Pattern includes the CreateNetworkAclEntry event in CloudWatch Alarm is incorrect because this event is for Network ACLs and not for Security Groups.
References:
https://aws.amazon.com/premiumsupport/knowledge-center/cloudtrail-event-history-changed/
Check out this AWS CloudTrail Cheat Sheet:
https://tutorialsdojo.com/aws-cloudtrail/
Incorrect
AWS KMS supports two resource-based access control mechanisms: key policies and grants. With grants you can programmatically delegate the use of KMS customer master keys (CMKs) to other AWS principals. You can use them to allow access, but not deny it. Because grants can be very specific, and are easy to create and revoke, they are often used to provide temporary permissions or more granular permissions.

Key users can implicitly give these services permissions to use the CMK in specific and limited ways. This implicit delegation is done using grants. These grants allow the integrated AWS service to use the CMK to protect resources in the account.
Hence, the correct answer is: Configure each application to use a grant on the KMS CMK which will add or remove specific access controls on the CMK.
The option that says: Configure each application to use a unique key policy that sets the specific access permissions on the CMK is incorrect because key policies are not capable of providing programmatic access control permissions, unlike grants. A key policy is primarily used for relatively static permission assignments. It uses the standard permissions model for AWS policies in which users either have or do not have permission to perform an action with a resource.
The option that says: Configure each application to use an IAM Role that sets the specific access permissions on the CMK is incorrect because an IAM Role only has a static set of permissions to access a specific resource. It is not capable of providing programmatic or dynamic access control permissions on the CMK, unlike grants.
The option that says: Configure each application to use an IAM policy that sets the specific access permissions on the CMK is incorrect because, just like an IAM Role, you cannot grant programmatic access control permissions using an IAM policy.
References:
https://docs.aws.amazon.com/kms/latest/developerguide/grants.html
https://docs.aws.amazon.com/kms/latest/developerguide/programming-grants.html
Check out this AWS Key Management Service Cheat Sheet:
https://tutorialsdojo.com/aws-key-management-service-aws-kms/
Incorrect
The Amazon DynamoDB Encryption Client is a software library that helps you to protect your table data before you send it to Amazon DynamoDB. Encrypting your sensitive data in transit and at rest helps ensure that your plaintext data isn’t available to any third party, including AWS.

The DynamoDB Encryption Client supports client-side encryption, where you encrypt your table data before you send it to DynamoDB. However, DynamoDB provides a server-side encryption at rest feature that transparently encrypts your table when it is persisted to disk and decrypts it when you access the table.
The tools that you choose depend on the sensitivity of your data and the security requirements of your application. You can use both the DynamoDB Encryption Client and encryption at rest. When you send encrypted and signed items to DynamoDB, DynamoDB doesn’t recognize the items as being protected. It just detects typical table items with binary attribute values.
DynamoDB creates and manages the cryptographic keys. The unique key for each table is protected by an AWS Key Management Service (AWS KMS) customer master key that never leaves AWS KMS unencrypted. By default, DynamoDB uses an AWS owned CMK in the DynamoDB service account, but you can elect to use an AWS managed CMK in your account for some or all of your tables.
Customer managed CMKs are CMKs in your AWS account that you create, own, and manage. You have full control over these CMKs, including establishing and maintaining their key policies, IAM policies, and grants, enabling and disabling them, rotating their cryptographic material, adding tags, creating aliases that refer to the CMK, and scheduling the CMKs for deletion.
Hence, the correct answer is:** Use Amazon DynamoDB Encryption client to encrypt the data.**
The option that says: Integrate Amazon DynamoDB Accelerator (DAX) to the DynamoDB table. Enable encryption at rest in Amazon DAX is incorrect because the data will go to DAX unencrypted in the first place. The scenario says that the data must be encrypted first before it is sent to DynamoDB. Moreover, customer-specified AWS KMS keys are not supported in Amazon DAX.
The option that says: Create a new S3 bucket and enable Server-Side Encryption with Customer-Provided Encryption Keys (SSE-C). Upload the data to the bucket then use AWS Data Pipeline to move all data to the DynamoDB table is incorrect because it is unnecessary for the data to go through S3. A better way is to use the Amazon DynamoDB Encryption Client to encrypt the data using a company-owned CMK.
The option that says: Configure the DynamoDB table to enable customer-managed CMK server-side encryption is incorrect because this will only protect the data at rest, but not in-flight. The scenario clearly said that the data must be encrypted with a customer-provided key first before it is sent to DynamoDB, not after.
References:
https://docs.aws.amazon.com/dynamodb-encryption-client/latest/devguide/what-is-ddb-encrypt.html
https://docs.aws.amazon.com/dynamodb-encryption-client/latest/devguide/encrypted-and-signed.html
https://docs.aws.amazon.com/dynamodb-encryption-client/latest/devguide/client-server-side.html
Check out this Amazon DynamoDB Cheat Sheet:
https://tutorialsdojo.com/amazon-dynamodb/
Incorrect
Key policies are the primary way to control access to customer master keys (CMKs) in AWS KMS. They are not the only way to control access, but you cannot control access without them. A key policy is a document that uses JSON (JavaScript Object Notation) to specify permissions. You can work with these JSON documents directly, or you can use the AWS Management Console to work with them using a graphical interface called the default view.

A key policy document cannot exceed 32 KB (32,768 bytes). Key policy documents use the same JSON syntax as other permissions policies in AWS and have the following basic structure:
A key policy document must have a Version element. In addition, a key policy document must have one or more statements, and each statement consists of up to six elements:
Sid – (Optional) The Sid is a statement identifier, an arbitrary string you can use to identify the statement.
Effect – (Required) The effect specifies whether to allow or deny the permissions in the policy statement. The Effect must be Allow or Deny. If you don’t explicitly allow access to a CMK, access is implicitly denied. You can also explicitly deny access to a CMK. You might do this to make sure that a user cannot access it, even when a different policy allows access.
Principal – (Required) The principal is the identity that gets the permissions specified in the policy statement. You can specify AWS accounts (root), IAM users, IAM roles, and some AWS services as principals in a key policy. IAM groups are not valid principals.
Action – (Required) Actions specify the API operations to allow or deny. For example, the kms:Encrypt action corresponds to the AWS KMS Encrypt operation. You can list more than one action in a policy statement
Resource – (Required) In a key policy, you use
"*"for the resource, which means “this CMK.” A key policy applies only to the CMK it is attached to.Condition – (Optional) Conditions specify requirements that must be met for a key policy to take effect. With conditions, AWS can evaluate the context of an API request to determine whether or not the policy statement applies.
The following example shows the policy statement that allows access to the AWS account and thereby enables IAM policies.
{ "Sid": "Enable IAM User Permissions", "Effect": "Allow", "Principal": {"AWS": "arn:aws:iam::111122223333:root"}, "Action": "kms:", "Resource": "" }
Hence, the correct answers are:
– Allows access for the 111122223333 AWS account to manage the KMS key access through IAM policies.
– Allows the AWS IAM service of the 111122223333 AWS Account to delegate permissions and KMS actions.
The option that says: Allows all IAM users in 111122223333 AWS Account to have full access to the KMS key is incorrect because only the root user will have full access.
The option that says: Allows the use of a KMS service-linked role to the root user in the 111122223333 AWS Account to access the KMS key is incorrect because a service-linked role is just a unique type of IAM role that is linked directly to AWS KMS. Service-linked roles are defined by AWS KMS and include all the permissions that the service requires to call other AWS services on your behalf.
The option that says: Allows the root user in the 111122223333 AWS Account to have a permissions boundary that is limited to KMS only is incorrect because a permissions boundary is simply an advanced feature for using a managed policy to set the maximum permissions that an identity-based policy can grant to an IAM entity. An entity’s permissions boundary allows it to perform only the actions that are allowed by both its identity-based policies and its permissions boundaries.
References:
https://docs.aws.amazon.com/kms/latest/developerguide/key-policies.html#key-policy-default
https://docs.aws.amazon.com/kms/latest/developerguide/control-access-overview.html#managing-access
Check out this AWS Key Management Service Cheat Sheet:
https://tutorialsdojo.com/aws-key-management-service-aws-kms/
Correct
Amazon RDS encrypted DB instances provide an additional layer of data protection by securing your data from unauthorized access to the underlying storage. You can use Amazon RDS encryption to increase data protection of your applications deployed in the cloud, and to fulfill compliance requirements for data-at-rest encryption.
Amazon RDS also supports encrypting an Oracle or SQL Server DB instance with Transparent Data Encryption (TDE). TDE can be used with encryption at rest, although using TDE and encryption at rest simultaneously might slightly affect the performance of your database. You must manage different keys for each encryption method. To manage the keys used for encrypting and decrypting your Amazon RDS resources, you use the AWS Key Management Service (AWS KMS). AWS KMS combines secure, highly available hardware and software to provide a key management system scaled for the cloud. Using AWS KMS, you can create encryption keys and define the policies that control how these keys can be used. AWS KMS supports CloudTrail, so you can audit key usage to verify that keys are being used appropriately. You can use your AWS KMS keys with Amazon RDS and supported AWS services such as Amazon S3, Amazon EBS, and Amazon Redshift.
For an Amazon RDS encrypted DB instance, all logs, backups, and snapshots are encrypted. A read replica of an Amazon RDS encrypted instance is also encrypted using the same key as the master instance when both are in the same AWS Region. If the master and read replica are in different AWS Regions, you encrypt using the encryption key for that AWS Region.
Keys generated by AWS KMS are only stored and used in the region in which they were created. They cannot be transferred to another region. For example; keys created in the EU-Central (Frankfurt) region are only stored and used within the EU-Central (Frankfurt) region.
Hence, the correct answer is: Set up a new CMK in the other region using AWS KMS. Create the encrypted read replica in another AWS Region by specifying the key identifier of the newly created CMK in the other Region.
The option that says: Create the encrypted read replica in another AWS Region by specifying the key identifier of the current CMK in the source Region is incorrect because the keys generated by AWS KMS are only stored and used in the region in which they were created. You can’t specify the key identifier of the current CMK in the source Region if you are creating a new read replica in another AWS Region.
The option that says: Import the current CMK from the source AWS Region to the new Region. Create the encrypted read replica in another AWS Region by specifying the key identifier of the imported CMK in the new Region is incorrect because you can’t import a CMK from one AWS Region to another. You have to create a new CMK in the new Region instead.
The option that says: Create the encrypted read replica in another AWS Region directly. The read replica will automatically be provisioned and encrypted with a customer managed CMK that is generated by Amazon RDS is incorrect because Amazon RDS will not automatically provide a customer managed CMK to your read replica in another AWS Region. You have to set up a new CMK in the other region using AWS KMS and then specify the key identifier of that newly created CMK.
**References: **
https://docs.aws.amazon.com/AmazonRDS/latest/UserGuide/Overview.Encryption.html
https://docs.aws.amazon.com/kms/latest/developerguide/services-rds.html
https://docs.aws.amazon.com/AmazonRDS/latest/UserGuide/USER_ReadRepl.html
Check out this Amazon RDS Cheat Sheet:
https://tutorialsdojo.com/amazon-relational-database-service-amazon-rds/
Correct
Launching an Amazon Linux or Windows Server instance with multiple network interfaces automatically configures interfaces, private IPv4 addresses, and route tables on the operating system of the instance. You can create a management network using network interfaces.
You can specify multiple private IPv4 and IPv6 addresses for your instances. The number of network interfaces and private IPv4 and IPv6 addresses that you can specify for an instance depends on the instance type. You associate security groups with network interfaces, not individual IP addresses. Therefore, each IP address you specify in a network interface is subject to the security group of its network interface.

You can create a primary network interface (eth0) on the instance that handles public traffic and the secondary network interface (eth1) handles backend management traffic and is connected to a separate subnet in your VPC that has more restrictive access controls. The public interface, which may or may not be behind a load balancer, has an associated security group that allows access to the server from the internet (for example, allow TCP port 80 and 443 from 0.0.0.0/0, or from the load balancer) while the private facing interface has an associated security group allowing SSH access only from an allowed range of IP addresses either within the VPC or from the Internet, a private subnet within the VPC or a virtual private gateway.
Correct
AWS CloudTrail is an AWS service that helps you enable governance, compliance, and operational and risk auditing of your AWS account. Actions taken by a user, role, or an AWS service are recorded as events in CloudTrail. Events include actions taken in the AWS Management Console, AWS Command Line Interface, and AWS SDKs and APIs. CloudTrail is enabled on your AWS account when you create it. When activity occurs in your AWS account, that activity is recorded in a CloudTrail event. You can easily view recent events in the CloudTrail console by going to Event history.
By default, trails do not log data events. The events that are logged by your trails are available in Amazon CloudWatch Events. For example, if you configure a trail to log data events for S3 objects but not management events, your trail processes and logs only data events for the specified S3 objects. The data events for these S3 objects are available in Amazon CloudWatch Events.
There are no predefined rules to track and send notifications about the use of IAM credentials. However, by using a combination of AWS CloudTrail and Amazon CloudWatch Events with a custom rule, you can send a notification to an Amazon Simple Notification Service (Amazon SNS) topic or Amazon Simple Queue Service (Amazon SQS) queue.
CloudWatch Events and rules are represented as JSON objects. A rule has a simple match or no match logic applied to events. Based on the structure of events, you can build custom patterns for the specific criteria that you want to match. You must have a trail enabled to send notifications to an SNS topic or SQS queue. Your trail’s management events must be configured as Write-only or All.
Hence, the correct answer is: Ensure that the trail’s management events are configured as Write-only or All.
Incorrect
Incidents in the infrastructure domain include data or network-related activity, such as the traffic to your Amazon EC2 instances within the VPC, processes, and data on your Amazon EC2 instances, and other areas. Your response to infrastructure domain events often involves retrieval, restoration, or acquisition of incident-related data for forensics. It likely includes interaction with the operating system of an instance, and in some cases, might also involve AWS API mechanisms.

Consider the following options for controlling network traffic to your EC2 instances:
Restrict access to your instances using security groups. Configure Amazon EC2 instance security groups to permit the minimum required network traffic for the Amazon EC2instance and to allow access only from defined, expected, and approved locations. For example, if an Amazon EC2 instance is an IIS web server, configure its security groups to permit only inbound HTTP/HTTPS, Windows management traffic, and minimal outbound connections.
Leverage security groups as the primary mechanism for controlling network access to Amazon EC2 instances. When necessary, use network ACLs sparingly to provide stateless, coarse-grain network control. Security groups are more versatile than network ACLs due to their ability to perform stateful packet filtering and create rules that reference other security groups. However, network ACLs can be effective as a secondary control for denying a specific subset of traffic or providing high-level subnet guard rails. Also, because network ACLs apply to an entire subnet, they can be used as defense-in-depth in case an instance is ever launched unintentionally without a correct security group.
Use VPC Flow Logs to monitor the traffic that reaches your instances.
Use AWS Security Hub to check for unintended network accessibility from your instances.
Use AWS Systems Manager Session Manager to access your instances remotely instead of opening inbound RDP ports.
Use AWS Systems Manager Run Command to automate common administrative tasks instead of opening inbound RDP ports.
Hence, the correct answers are:
Use VPC Flow Logs to monitor the traffic that reaches your instances.
Use AWS Security Hub to check for unintended network accessibility from your instances.
The option that says: Use AWS Systems Manager State Manager to access your instances remotely instead of opening inbound RDP ports is incorrect because the Systems Manager State Manager is primarily used to maintain consistent configuration of your Amazon EC2 or on-premises instances such as the server configurations, anti-virus definitions, firewall settings, and details. It is not used to remotely access your EC2 instances. You have to use the Systems Manager Session Manager service instead.
The option that says: Attach an AWS Transit Gateway to the VPC to enable instances in a private subnet to connect to the internet but prevent the internet from initiating a connection with those instances is incorrect because an AWS Transit Gateway is a just service that enables customers to connect their Amazon Virtual Private Clouds (VPCs) and their on-premises networks to a single gateway. A better option here is to use a NAT Gateway.
The option that says: Enable automatic key rotation on all AWS managed CMKs to rotate the keys every year is incorrect because you cannot manage key rotation for AWS managed CMKs. In addition, AWS KMS automatically rotates AWS managed CMKs every three years and not every year.
References:
https://d1.awsstatic.com/whitepapers/aws_security_incident_response.pdf
https://docs.aws.amazon.com/AWSEC2/latest/WindowsGuide/infrastructure-security.html
https://d0.awsstatic.com/whitepapers/aws-security-best-practices.pdf
Check out this AWS Security Hub Cheat Sheet:
https://tutorialsdojo.com/aws-security-hub/
Correct
A request results in an explicit deny if an applicable policy includes a Deny statement. If policies that apply to a request include an Allow statement and a Deny statement, the Deny statement trumps the Allow statement. The request is explicitly denied.
An implicit denial occurs when there is no applicable Deny statement but also no applicable Allow statement. Because an IAM user, role, or federated user is denied access by default, they must be explicitly allowed to perform an action. Otherwise, they are implicitly denied access.
When you design your authorization strategy, you must create policies with Allow statements to allow your principals to successfully make requests.

By default, all Amazon S3 resources—buckets, objects, and related subresources (for example, lifecycle configuration and website configuration)—are private: only the resource owner, an AWS account that created it, can access the resource. The resource owner can optionally grant access permissions to others by writing an access policy.
Amazon S3 offers access policy options broadly categorized as resource-based policies and user policies. Access policies you attach to your resources (buckets and objects) are referred to as resource-based policies. For example, bucket policies and access control lists (ACLs) are resource-based policies. You can also attach access policies to users in your account. These are called user policies. You may choose to use resource-based policies, user policies, or some combination of these to manage permissions to your Amazon S3 resources. The introductory topics provide general guidelines for managing permissions.
In this scenario, there are no implicit denies on both the bucket policy and the IAM policy attached to Stacey’s IAM User. Although the second bucket doesn’t have an associated bucket policy, there is still an IAM policy attached to the user that allows access to that bucket. By default, all Amazon S3 buckets are private and inaccessible. An IAM user can only access the bucket if it has the necessary permissions defined on its IAM policy or if the bucket policy explicitly allowed the user.
Hence, the correct answers is: Both the dojobucket1 and dojobucket2 buckets.
References:
https://docs.aws.amazon.com/IAM/latest/UserGuide/reference_policies_evaluation-logic.html
https://docs.aws.amazon.com/AmazonS3/latest/dev/s3-access-control.html
Check out these AWS Identity & Access Management (IAM) and Amazon S3 Cheat Sheets:
https://tutorialsdojo.com/aws-identity-and-access-management-iam/
https://tutorialsdojo.com/amazon-s3/
Correct
AWS CloudTrail is an AWS service that helps you enable governance, compliance, and operational and risk auditing of your AWS account. Actions taken by a user, role, or an AWS service are recorded as events in CloudTrail. Events include actions taken in the AWS Management Console, AWS Command Line Interface, and AWS SDKs and APIs.
You can configure your trail to send events to CloudWatch Logs. You can then use CloudWatch Logs to monitor your account for specific API calls and events. Take note that if you configure a trail (that applies to all regions) to send events to a CloudWatch Logs log group, CloudTrail sends events from all regions to a single log group.

You can configure CloudTrail with CloudWatch Logs to monitor your trail logs and be notified when specific activity occurs.
Configure your trail to send log events to CloudWatch Logs.
Define CloudWatch Logs metric filters to evaluate log events for matches in terms, phrases, or values. For example, you can monitor for
ConsoleLoginevents.Assign CloudWatch metrics to the metric filters.
Create CloudWatch alarms that are triggered according to thresholds and time periods that you specify. You can configure alarms to send notifications when alarms are triggered, so that you can take action.
You can also configure CloudWatch to automatically perform an action in response to an alarm.
Hence, the correct answer is: Enable CloudTrail in the AWS Account. Set up a CloudWatch metric filter that monitors API call error codes. Create a new CloudWatch Alarm based on that metric’s rate and send the notifications using Amazon SNS.
Correct
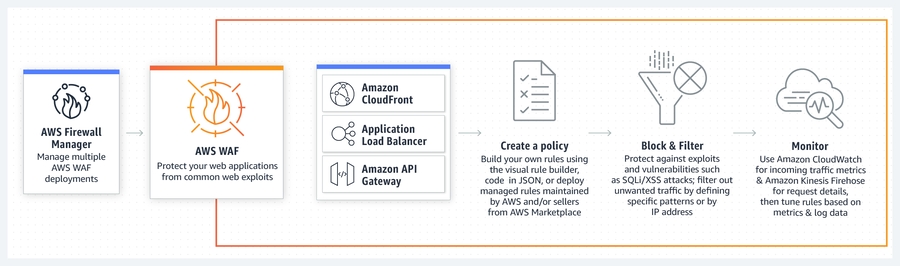
A rate-based rule tracks the rate of requests for each originating IP address, and triggers the rule action on IPs with rates that go over a limit. You set the limit as the number of requests per 5-minutes time span. You can use this type of rule to put a temporary block on requests from an IP address that’s sending excessive requests.
When the rule action triggers, AWS WAF blocks additional requests from the IP address until the request rate falls below the limit.
You can narrow the scope of the requests that AWS WAF counts. To do this, you nest another statement inside the rate-based statement. Then, AWS WAF only counts requests that match the nested statement. For example, based on recent requests that you’ve seen from an attacker in the United States, you might create a rate-based rule with the following nested statement:
ANDrule statement that contains the following, second level of nested statements:A geo-match match statement that specifies requests originating in the United States.
A string match statement that searches in the
User-Agentheader for the stringBadBot.
Let’s say that you also set a rate limit of 1,000. For each IP address, AWS WAF counts requests that meet both of the conditions. Requests that don’t meet both conditions aren’t counted. If the count for an IP address exceeds 1,000 requests in any 5-minute time span, the rule’s action triggers against that IP address.
As another example, you might want to limit requests to the login page on your website. To do this, you could create a rate-based rule with the following nested string match statement:
The Request option is
URI.The Match Type is
Starts with.A Strings to match is
login.
By adding this rate-based rule to a web ACL, you could limit requests to your login page without affecting the rest of your site.
Hence, the correct answer is: Integrate AWS WAF with the ALB. Set up a rate-based rule in AWS WAF to limit the incoming requests to the login page
that has a User-Agent header set to the: Mozilla/5.0 (compatible; DojoHack; Macintosh; Intel Mac OS X 10.13; rv:74.0)
Correct
You can have CloudTrail deliver log files from multiple AWS accounts into a single Amazon S3 bucket. For example, you have four AWS accounts with account IDs 111111111111, 222222222222, 333333333333, and 444444444444, and you want to configure CloudTrail to deliver log files from all four of these accounts to a bucket belonging to account 111111111111. To accomplish this, complete the following steps in order:
Turn on CloudTrail in the account where the destination bucket will belong (111111111111 in this example). Do not turn on CloudTrail in any other accounts yet.
Update the bucket policy on your destination bucket to grant cross-account permissions to CloudTrail.
Turn on CloudTrail in the other accounts you want (222222222222, 333333333333, and 444444444444 in this example). Configure CloudTrail in these accounts to use the same bucket belonging to the account that you specified in step 1 (111111111111 in this example).

For a bucket to receive log files from multiple accounts, its bucket policy must grant CloudTrail permission to write log files from all the accounts you specify. This means that you must modify the bucket policy on your destination bucket to grant CloudTrail permission to write log files from each specified account.
Here’s a sample S3 bucket policy that allows CloudTrail to push logs from multiple AWS accounts to a single centralized account. Take note that the Log File Prefix is just optional and doesn’t need to be identical to the name of the S3 bucket.
{ "Version": "2012-10-17", "Statement": [ { "Sid": "AWSCloudTrailAclCheck20131101", "Effect": "Allow", "Principal": { "Service": "cloudtrail.amazonaws.com" }, "Action": "s3:GetBucketAcl", "Resource": "arn:aws:s3:::myBucketName" }, { "Sid": "AWSCloudTrailWrite20131101", "Effect": "Allow", "Principal": { "Service": "cloudtrail.amazonaws.com" }, "Action": "s3:PutObject", "Resource": [ "arn:aws:s3:::myBucketName/[optional] myLogFilePrefix/AWSLogs/111111111111/", "arn:aws:s3:::myBucketName/[optional] myLogFilePrefix/AWSLogs/222222222222/" ], "Condition": { "StringEquals": { "s3:x-amz-acl": "bucket-owner-full-control" } } } ] }
Hence, the correct answers are:
Ensure that the S3 bucket policy grants AWS CloudTrail the permission to write log files from the AWS accounts. Verify that the specified AWS Account IDs are correct.
Ensure that each trail is active using the CloudTrail console and verify that the specified destination S3 bucket name is correctly configured.
Incorrect
Server-side encryption is the encryption of data at its destination by the application or service that receives it. AWS Key Management Service (AWS KMS) is a service that combines secure, highly available hardware and software to provide a key management system scaled for the cloud. Amazon S3 uses AWS KMS customer master keys (CMKs) to encrypt your Amazon S3 objects. SSE-KMS encrypts only the object data. Any object metadata is not encrypted. If you use customer-managed CMKs, you use AWS KMS via the AWS Management Console or AWS KMS APIs to centrally create encryption keys, define the policies that control how keys can be used, and audit key usage to prove that they are being used correctly. You can use these keys to protect your data in Amazon S3 buckets.
A customer master key (CMK) is a logical representation of a master key. The CMK includes metadata, such as the key ID, creation date, description, and key state. The CMK also contains the key material used to encrypt and decrypt data. You can use a CMK to encrypt and decrypt up to 4 KB (4096 bytes) of data. Typically, you use CMKs to generate, encrypt, and decrypt the data keys that you use outside of AWS KMS to encrypt your data. This strategy is known as envelope encryption.
You have three mutually exclusive options depending on how you choose to manage the encryption keys:
Use Server-Side Encryption with Amazon S3-Managed Keys (SSE-S3) – Each object is encrypted with a unique key. As an additional safeguard, it encrypts the key itself with a master key that it regularly rotates. Amazon S3 server-side encryption uses one of the strongest block ciphers available, 256-bit Advanced Encryption Standard (AES-256), to encrypt your data.
Use Server-Side Encryption with Customer Master Keys (CMKs) Stored in AWS Key Management Service (SSE-KMS) – Similar to SSE-S3, but with some additional benefits and charges for using this service. There are separate permissions for the use of a CMK that provides added protection against unauthorized access of your objects in Amazon S3. SSE-KMS also provides you with an audit trail that shows when your CMK was used and by whom. Additionally, you can create and manage customer-managed CMKs or use AWS managed CMKs that are unique to you, your service, and your Region.
Use Server-Side Encryption with Customer-Provided Keys (SSE-C) – You manage the encryption keys and Amazon S3 manages the encryption, as it writes to disks, and decryption when you access your objects.
In the scenario, the company needs to store financial files in AWS which are accessed every week and the solution should use envelope encryption. This requirement can be fulfilled by using an Amazon S3 configured with Server-Side Encryption with AWS KMS-Managed Keys (SSE-KMS).
Hence, the correct answers are:
– Store the confidential financial files in Amazon S3
– Enable Server-Side Encryption with AWS KMS-Managed Keys (SSE-K
Security headers are a group of headers in the HTTP response from a server that tell your browser how to behave when handling your site’s content. For example, X-XSS-Protection is a header that Internet Explorer and Chrome respect to stop the pages loading when they detect cross-site scripting (XSS) attacks. You can automatically add a set of HTTP security headers using Lambda@Edge by creating a function that gets the contents of the response, sets the new headers, then returns the updated response that includes the new headers.
Incorrect
By default, Amazon S3 buckets and objects are private. Only the resource owner (the AWS account that created the bucket) can access the bucket and objects it contains. The resource owner can grant access permissions to other resources and users by writing an access policy. If you want to create or modify an Amazon S3 bucket to receive the log files for an organization trail, you must further modify the bucket policy.
To deliver log files to an S3 bucket, CloudTrail must have the required permissions, and it cannot be configured as a Requester Pays bucket. CloudTrail automatically attaches the required permissions to a bucket when you create an Amazon S3 bucket as part of creating or updating a trail in the CloudTrail console.

When you create a new bucket as part of creating or updating a trail, CloudTrail attaches the required permissions to your bucket. The bucket policy uses the service principal name, "cloudtrail.amazonaws.com", which allows CloudTrail to deliver logs for all regions.
If CloudTrail is not delivering logs for a region, it’s possible that your bucket has an older policy that specifies CloudTrail account IDs for each region. This policy gives CloudTrail permission to deliver logs only for the regions specified.
As a best practice, update the policy to use a permission with the CloudTrail service principal. To do this, replace the account ID ARNs with the service principal name: "cloudtrail.amazonaws.com". This gives CloudTrail permission to deliver logs for current and new regions.
If you try to add, modify, or remove a log file prefix for an S3 bucket that receives logs from a trail, you may see the error: There is a problem with the bucket policy. A bucket policy with an incorrect prefix can prevent your trail from delivering logs to the bucket. To resolve this issue, use the Amazon S3 console to update the prefix in the bucket policy, and then use the CloudTrail console to specify the same prefix for the bucket in the trail.
Hence, the correct answers are:
Ensure that the Requester Pays feature is disabled in the S3 bucket.
Verify that the S3 bucket doesn’t have an older policy that overrides and limits CloudTrail’s permission to deliver logs only to certain regions.
Ensure that the log file prefix defined in AWS CloudTrail still exists in the S3 bucket and is not accidentally deleted.
Correct
By default, the log files delivered by CloudTrail to your bucket are encrypted by Amazon server-side encryption with Amazon S3-managed encryption keys (SSE-S3). To provide a security layer that is directly manageable, you can instead use server-side encryption with AWS KMS–managed keys (SSE-KMS) for your CloudTrail log files. Take note that enabling server-side encryption encrypts the log files but not the digest files with SSE-KMS. Digest files are encrypted with Amazon S3-managed encryption keys (SSE-S3).
To use SSE-KMS with CloudTrail, you create and manage a KMS key, also known as a customer master key (CMK). You attach a policy to the key that determines which users can use the key for encrypting and decrypting CloudTrail log files. The decryption is seamless through S3. When authorized users of the key read CloudTrail log files, S3 manages the decryption, and the authorized users are able to read log files in unencrypted form.
This approach has the following advantages:
You can create and manage the CMK encryption keys yourself.
You can use a single CMK to encrypt and decrypt log files for multiple accounts across all regions.
You have control over who can use your key for encrypting and decrypting CloudTrail log files. You can assign permissions for the key to the users in your organization according to your requirements.
You have enhanced security. With this feature, in order to read log files, the following permissions are required:
A user must have S3 read permissions for the bucket that contains the log files.
A user must also have a policy or role applied that allows decrypt permissions by the CMK policy.
Because S3 automatically decrypts the log files for requests from users authorized to use the CMK, SSE-KMS encryption for CloudTrail log files is backward-compatible with applications that read CloudTrail log data.
The CMK that you choose must be created in the same AWS Region as the Amazon S3 bucket that receives your log files. For example, if the log files will be stored in a bucket in the US East (Ohio) Region, you must create or choose a CMK that was created in that Region. To verify the Region for an Amazon S3 bucket, inspect its properties in the Amazon S3 console.
Hence, the correct answer is: Use server-side encryption with AWS KMS–managed keys (SSE-KMS) for the CloudTrail log files.
The option that says: Use Encrypt API from AWS KMS to directly encrypt all log files in AWS CloudTrail every time it is created is incorrect because the Encrypt operation is primarily used to encrypt small amounts of arbitrary data, such as a personal identifier, database password or other sensitive information, and not the entire data.
The option that says: Do nothing since there is already a default Amazon server-side encryption with Amazon S3-managed encryption keys (SSE-S3) applied to the CloudTrail log files is incorrect because although it is true that CloudTrail is using SSE-S3 by default, it still doesn’t satisfy the requirement that the CMK can be used to encrypt and decrypt log files for multiple accounts across all regions. You have to use the server-side encryption with AWS KMS–managed keys (SSE-KMS) instead.
The option that says: Enable log file integrity validation that automatically encrypts the AWS CloudTrail logs using a Customer Master Key (CMK) from AWS KMS is incorrect because the log file integrity validation simply determines whether a log file was modified, deleted, or unchanged after CloudTrail delivered it. This is not used for log encryption but for tracking.
Correct
If the CloudWatch Logs Agent (awslogs) stopped pushing the log data to Amazon CloudWatch Logs, you can do the following:
If logs stopped pushing after a log rotation, check the supported log rotation methods.
If logs are only pushed for a short time after the awslogs agent is restarted, check for duplicates in the [logstream] section of the agent configuration file. Each section must have a unique name.
If the awslogs.log log file takes up too much disk space, check the log file for errors and correct them. If the log file only contains informational messages, specify a lower logging level for the logging_config_file option in the agent configuration file.
Review the**/var/log/awslogs.log** log file. Be sure to note any error messages.
Incorrect
CloudFront assigns a default domain name to your distribution, for example, d111111abcdef8.cloudfront.net. If you use this domain name, then you can use the CloudFront default SSL/TLS certificate already selected for your distribution. If you use a different domain name for your distribution, it’s a best practice to do one of the following to avoid domain name related certificate warnings:
Request a public certificate from AWS Certificate Manager.
Import certificates into AWS Certificate Manager.
To use an ACM certificate with Amazon CloudFront, you must request or import the certificate in the US East (N. Virginia) region. ACM certificates in this region that are associated with a CloudFront distribution are distributed to all the geographic locations configured for that distribution.
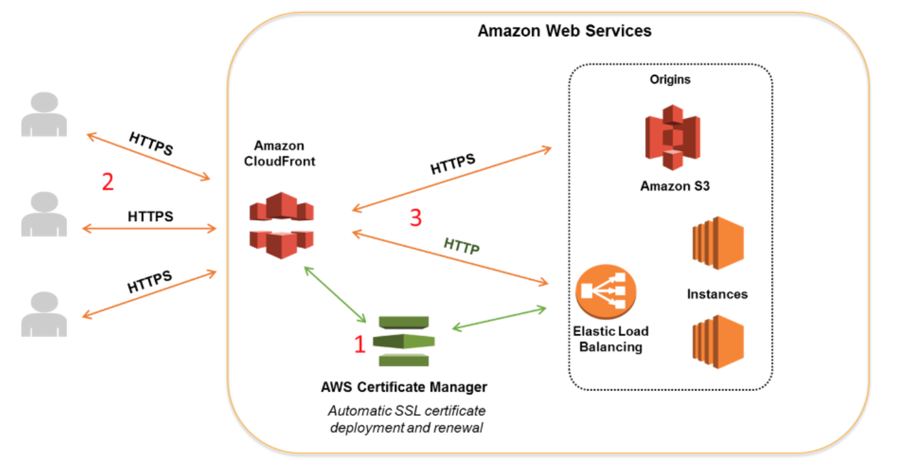
If you want to require HTTPS between viewers and CloudFront, you must change the AWS region to US East (N. Virginia) in the AWS Certificate Manager console before you request or import a certificate. If you want to require HTTPS between CloudFront and your origin and you’re using an ELB load balancer as your origin, you can request or import a certificate in any region.
Hence, the correct answer is: **Generate one certificate in the US West (N. California) region and one in the US East (Virginia) region. **
Incorrect
You can configure your environment to stream logs to Amazon CloudWatch Logs in the Elastic Beanstalk console or by using configuration options. With CloudWatch Logs, each instance in your environment streams logs to log groups that you can configure to be retained for weeks or years, even after your environment is terminated.
The set of logs streamed varies per environment, but always includes eb-activity.log and access logs from the NGINX or Apache proxy server that runs in front of your application. You can configure log streaming in the Elastic Beanstalk console either during environment creation or for an existing environment.
The Amazon EC2 instances in your Elastic Beanstalk environment generate logs that you can view to troubleshoot issues with your application or configuration files. Logs created by the web server, application server, Elastic Beanstalk platform scripts, and AWS CloudFormation are stored locally on individual instances. You can easily retrieve them by using the environment management console or the EB CLI. You can also configure your environment to stream logs to Amazon CloudWatch Logs in real time.
Tail logs are the last 100 lines of the most commonly used log files—Elastic Beanstalk operational logs and logs from the web server or application server. When you request tail logs in the environment management console or with eb logs, an instance in your environment concatenates the most recent log entries into a single text file and uploads it to Amazon S3.
If the CloudWatch Logs Agent (awslogs) stopped pushing the log data to Amazon CloudWatch Logs, you can do the following:
If logs stopped pushing after a log rotation, check the supported log rotation methods.
If logs are only pushed for a short time after the awslogs agent is restarted, check for duplicates in the [logstream] section of the agent configuration file. Each section must have a unique name.
If the awslogs.log log file takes up too much disk space, check the log file for errors and correct them. If the log file only contains informational messages, specify a lower logging level for the logging_config_file option in the agent configuration file.
Hence, the correct answers are:
Check the configured log rotation rules of the application and ensure that it is compatible with CloudWatch Log Agent streaming configuration.
Check for duplicates in the
[logstream]section of the agent configuration file.
Correct
If you’re using flow logs to diagnose overly restrictive or permissive security group rules or network ACL rules then be aware of the statefulness of these resources. Security groups are stateful — this means that responses to allowed traffic are also allowed, even if the rules in your security group do not permit it. Conversely, network ACLs are stateless, therefore responses to allowed traffic are subject to network ACL rules.
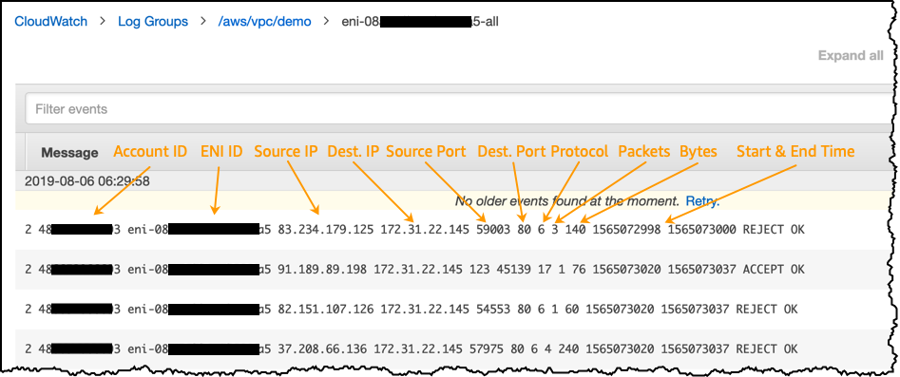
For example, you use the ping command from your home computer (IP address is 203.0.113.12) to your instance (the network interface’s private IP address is 172.31.16.139). Your security group’s inbound rules allow ICMP traffic and the outbound rules do not allow ICMP traffic; however, because security groups are stateful, the response ping from your instance is allowed. Your network ACL permits inbound ICMP traffic but does not permit outbound ICMP traffic. Because network ACLs are stateless, the response ping is dropped and does not reach your home computer.
In a flow log, this is displayed as two flow log records:
An
ACCEPTrecord for the originating ping that was allowed by both the network ACL and the security group, and therefore was allowed to reach your instance.
2 123456789010 eni-1235b8ca 203.0.113.12 172.31.16.139 0 0 1 4 336 1432917027 1432917142 ACCEPT OK
A
REJECTrecord for the response ping that the network ACL denied.
2 123456789010 eni-1235b8ca 172.31.16.139 203.0.113.12 0 0 1 4 336 1432917094 1432917142 REJECT OK
A flow log record is a space-separated string that has the following format:
*<version> <account-id> <interface-id> <srcaddr> <dstaddr> <srcport> <dstport> <protocol> <packets> <bytes> <start> <end> <action> <log-status>*
Incorrect
IAM and AWS STS are integrated with AWS CloudTrail, a service that provides a record of actions taken by an IAM user or role. CloudTrail captures all API calls for IAM and AWS STS as events, including calls from the console and from API calls. If you create a trail, you can enable continuous delivery of CloudTrail events to an Amazon S3 bucket. If you don’t configure a trail, you can still view the most recent events in the CloudTrail console in Event history. You can use CloudTrail to get information about the request that was made to IAM or AWS STS. For example, you can view the IP address from which the request was made, who made the request, when it was made, and additional details.
If you want to view and track account activity history for specific IAM users, roles, and AWS access keys, you can use AWS CloudTrail event history, Amazon CloudWatch queries, or Amazon Athena queries. You can use CloudTrail to search event history for the last 90 days only. You can run CloudWatch queries to search the API history made by a specific IAM user or access key beyond the last 90 days. Alternatively, consider using Amazon Athena to query CloudTrail logs over the last 90 days.
Hence, the correct answers are:
Last updated